Getting values and fcurves for the port parameters of an ICE node


ICE nodes have ports, and the ports have parameters. It’s the parameters that you work with in an ICE node PPG.

For simple types such as float, integer and boolean, you can access the port parameter value through ICENodeInputPort.Value. However, for more complex types, like a 3D vector, you need to go through the ICENodeInputPort.Parameters.

In either case (simple or complex types), to get an Fcurve, you get a parameter and then use Parameter.Source.

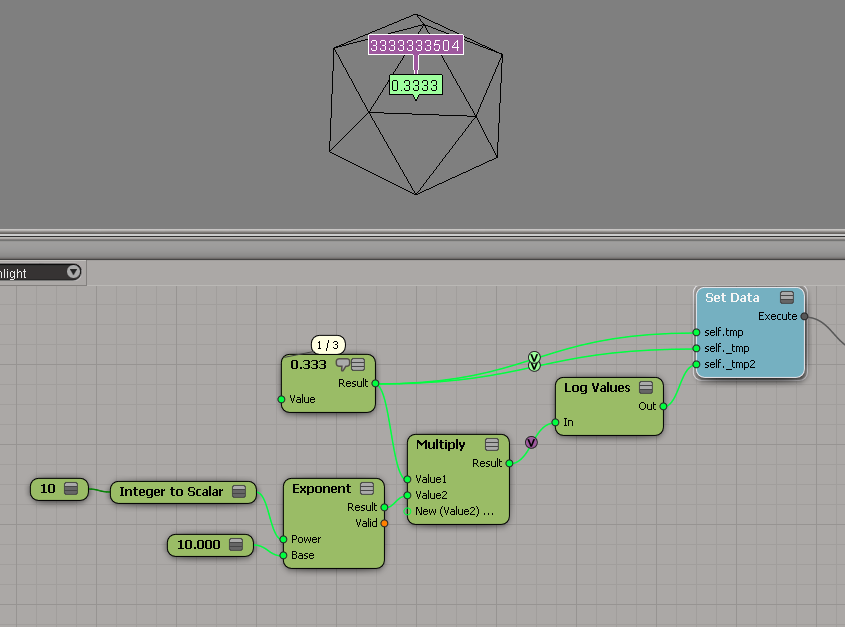
For example, suppose you have a Scalar node:
ports_params_Scalar
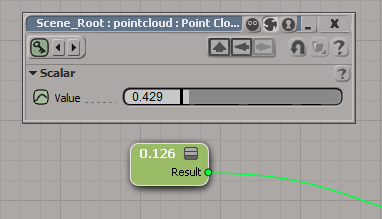
To get the value from a Scalar node, you’d do this:

si = Application
node = si.Dictionary.GetObject( "pointcloud.pointcloud.ICETree.ScalarNode" )
port = node.InputPorts(0)

# For scalars, you can just use the port.Value property
print port.Value

# Or you could go through the Parameters
print port.Parameters(0).Value
# 0.428628623486
# 0.428628623486

# It's a little confusing because the port and the parameter have the same name:
print port.FullName
print port.Parameters(0).FullName
# pointcloud.pointcloud.ICETree.ScalarNode.value


# Now get the Fcurve
fcv = param.Source

Now consider the case of a 3D Vector node, where you have one port (value) and three parameters (value_x, value_y, and value_z):
ports_params_3DVector
In this case, you cannot use ICENodeInputPort.Value, so you have to go through the parameters collection:

si = Application
node = si.Dictionary.GetObject( "pointcloud.pointcloud.ICETree.3DVectorNode" )
port = node.InputPorts(0)
print port.FullName # pointcloud.pointcloud.ICETree.3DVectorNode.value
param = port.Parameters( 0 )
print param.FullName # pointcloud.pointcloud.ICETree.3DVectorNode.value_x
print param.Value # 0.933080613613

# Now get the Fcurve
fcv = param.Source

hat tip: Alan Fregtman

Linking an ICE compound to a help page


The short answer is that you can’t do it, not really. The best you can do is provide a URL in the compound properties
Compound_URL
and then right-click the compound and click Open Netview on URL.
Compound_Open_URL_in_Netview

For ICE compounds, a CompoundNode property is loaded into the PPG when you inspect the compound.
C3DCompoundNode
This CompoundNode is like a proxy container for the actual compound, and it takes care of populating the PPG with the required controls, and finding the right help page. To do that, it just takes the name of the compound and constructs a URL like http://download.autodesk.com/global/docs/softimage2014/en_us/userguide/files/iceref_MyCompound.htm. (Hmm, having just said that, I figure if you had a local version of the help, then you could stick your own help page there, and Softimage would find it.)

For shader compounds it’s a little better, because you can put something like this in your PPG Logic, and it will work.

#ppg logic start
from win32com.client import constants

def OnInit():
    Application.LogMessage( "OnInit" )
    PPG.PPGLayout.SetAttribute( constants.siUIHelpFile, "http://lmgtfy.ca" )
#ppg logic end

hat tip: everybody on this thread

Screenshots of the week


Arnold shader “OSO” in emTools version 1.910
by Mootzoid
Shader_emToolsArnold_OSO

A script that applies fur via ICE. And Compression Matting on the fur

feathers and script improvements

Compression Matting on fur controlled by texture map

UV to position
by Mathaeus
uv_to_position

Transform UVs in the render tree
by NNois
Capture

Select in Array until Max Sum

Read color information of a texture map
by face
color

About transformation matrices…


You don’t necessarily have to understand everything about transformation matrices to use them. Just understand then when you multiply a point by a transformation matrix, you’re applying scaling, rotation, and translation to that point all at once.

If you do want to understand more, you can use ICE to visualize what goes into a transformation matrix:
srt-transfo-matrix

And you can do some reading 🙂

Getting ICE attribute values with greater precision


As you know, in Softimage all scalar (aka floating point) values are displayed with 3 (or sometimes 4) decimal places. For example: 0.333 instead of 0.33333333333…

One way to display the attribute value with greater precision is to use the Log Values node, and multiply the attribute value by some power of 10 (to get more digits). Hat tip to Leonard Koch for that suggestion.
ICE_attribute_values
The above Log Values outputs this:

# INFO : 4000 - elt 0: 3333333504.000000

You could also use scripting. But note how I get 0 for the attribute named _tmp, even though it is clearly set to 0.3333333333333 in the ICE graph.

x = si.Selection(0)
y = x.ActivePrimitive.Geometry.ICEAttributes( "tmp" )
if y.IsDefined:
	print "tmp = %.10f" % y.DataArray[0]
	
y = x.ActivePrimitive.Geometry.ICEAttributes( "_tmp" )
if y.IsDefined:
	print "_tmp = %.10f" % y.DataArray[0]

# tmp = 0.3333333433
# _tmp = 0.0000000000

Finally, here’s a quick hack using a proxy parameter and the SDK explorer:
ICE_attribute_values2

More fun with arrays


Here’s a recent array question from the mailing list: How do you build an array that looks like this?

[0, 0, 1, 1, 0, 0, 1, 1, 0, 0, 1, 1, ...] ?

I didn’t check the other answers yet, because that would be cheating 😉

When I look at that array, I see a repeating sequence of four integers, so that naturally suggests doing something with the Modulo node.

Arrays_0011_modulo

Using the If node is nice for clarity, but I could simply take the Boolean output of the comparison node.