Installing PyQtForSoftimage in Softimage 2015


I use the Python 2.7.3 that comes with Softimage 2015 SP1, but I do also have Python 2.7 installed on my system.

  1. Download and install PyQt.
  2. Set the PYTHONPATH environment variable to point to the location of PyQt4. You could do this in setenv.bat, or in the System environment variables. In my case, I set it in setenv.bat to point to C:\Python27\Lib\site-packages, which is where I installed PyQt.
  3. Download and install the PyQtForSoftimage addon.
  4. Check that everything is working. Open the Plug-in Manager, find PyQtForSoftimage, and run some of the examples.

[ICE] Converting integers to strings


Thanks to Mootzoid emTools, it’s easy to convert an integer to a string:
int2str_emtools
Note that you get padding too, so it’s easy to do things like generating replacements for the [Frame] token.
int2str_emtools_ntoa
The emTools string compounds are convenience compounds:
int2str_emtools_ntoa

For fun, I tried to create my own integer-to-string converter using the stock nodes. I did by dividing by 10 until the quotient (the result) was zero; with each division, I take the remainder and stick it at the front of the string. And by setting Max Repeat to 4, I get padding on my strings (so for integer 45 I get “0045”).
int2str_intdiv
Note the use of Delay Set Data. The integer division compound uses Modulo and Division by Scalar. The 2char compound simply uses a Select Case to map a single digit to a string:
int2str_2char

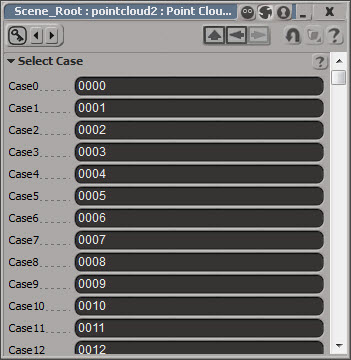
It did occur to me that I could do it all with a single Select Case 🙂
int2str_selectcase
The catch is that the Select Case node has ten thousand cases.
int2str_selectcase_ppg
That’s really slow when you create that node in an ICE tree (for example, by importing a compound that uses it). It also takes a long time to create ten thousand cases, even with a script.

case_node = Application.AddICENode("$XSI_DSPRESETS\\ICENodes\\SelectCaseNode.Preset", "pointcloud1.pointcloud.ICETree")
string_node = Application.AddICENode("$XSI_DSPRESETS\\ICENodes\\StringNode.Preset", "pointcloud1.pointcloud.ICETree")

Application.ConnectICENodes("{0}.case0".format( case_node.FullName ), "{0}.result".format( string_node.FullName ) )
Application.DeleteObj( string_node.FullName )
Application.SetValue("{0}.case{1}_string".format( case_node.FullName, 0), "{0:0>4}".format(0), "")
Application.SetValue("{0}.default_string".format( case_node.FullName, "9999", "")

for i in range(1,10000):
	Application.AddPortToICENode("{0}.case{1}".format( case_node.FullName, i-1), "siNodePortDataInsertionLocationAfter")
	Application.SetValue("{0}.case{1}_string".format( case_node.FullName, i), "{0:0>4}".format(i), "")

[Scripting] Opening a page in a web browser


Here’s a couple of ways to open a URL in a web browser from inside Softimage. Unfortunately, these worked on Windows only. On Linux, the JScript can’t create that ActiveX object, and the Python didn’t do anything.

JScript:

// Open a web page in the default browser
var objShell = new ActiveXObject("shell.application");
objShell.ShellExecute("http://support.solidangle.com", "", "", "open", 1);

Python:

import webbrowser
webbrowser.open( 'http://support.solidangle.com' )

How to check if an object exists with no error handling


Yes, this old chestnut…I thought I had posted this ages ago, but I don’t see in the archives, so:

If you want to check if an object exists, and you don’t want to deal with any error handling, then do it this way:

from sipyutils import disp		# win32com.client.Dispatch

def objExists( name ):
    c = disp( "XSI.Collection" )
    c.Items = name
    return not( c.Count == 0 )

print 'Object does exist' if objExists( "XSI_Man.geom" ) else 'Does not exist'

Getting the plugin path


You can use the OriginPath property to get the location of a plugin, but OriginPath is available in the scope of a plugin callback only.

__sifile__ and __sipath__, however, can be used in the global scope.

import win32com.client
from win32com.client import constants

import sipyutils

Application.LogMessage( "Global: __sipath__=%s" % __sipath__ )
Application.LogMessage( "Global: __sifile__=%s" % __sifile__ )

null = None
false = 0
true = 1

def XSILoadPlugin( in_reg ):
	in_reg.Author = "SOLIDANGLE"
	in_reg.Name = "TestPlugin"
	in_reg.Major = 1
	in_reg.Minor = 0

	#Register plugin items

	Application.LogMessage( "XSILoadPlugin: __sipath__=%s" % __sipath__ )
	Application.LogMessage( "XSILoadPlugin: __sifile__=%s" % __sifile__ )
	Application.LogMessage( "XSILoadPlugin: in_reg.OriginPath=%s" % in_reg.OriginPath )

	return true

The above will output something like the following:

# INFO : Global: __sipath__=C:\Users\SOLIDANGLE\Autodesk\Softimage_2015\Application\Plugins
# INFO : Global: __sifile__=C:\Users\SOLIDANGLE\Autodesk\Softimage_2015\Application\Plugins\TestPlugin.py
# INFO : XSILoadPlugin: __sipath__=C:\Users\SOLIDANGLE\Autodesk\Softimage_2015\Application\Plugins
# INFO : XSILoadPlugin: __sifile__=C:\Users\SOLIDANGLE\Autodesk\Softimage_2015\Application\Plugins\TestPlugin.py
# INFO : XSILoadPlugin: in_reg.OriginPath=C:\Users\SOLIDANGLE\Autodesk\Softimage_2015\Application\Plugins\

Getting all shaders under a light


Given something like this:
light_disconnected shaders
Here’s how you get all shaders under a light, even the disconnected ones:

from sipyutils import si		# win32com.client.Dispatch('XSI.Application')
from sipyutils import log		# LogMessage
from sipyutils import C			# win32com.client.constants
from sipyutils import disp		# win32com.client.Dispatch

si = si()

def dispFix( badDispatch ):
    import win32com.client.dynamic
    # Re-Wraps a bad dispatch into a working one:
    return win32com.client.dynamic.Dispatch(badDispatch)

oLight = si.Selection(0)


#import win32com.client
oDisconnected = disp( "XSI.Collection" )

if oLight.IsClassOf( C.siLightID ):
	for oShader in oLight.GetAllShaders():
		oOut = dispFix( oShader.Parameters( "out" ) )
		if oOut.Targets.Count == 0:
			oDisconnected.Add( oShader )
			
log( oDisconnected.GetAsText() )

Hat tip: Matt Lind, who provided the GetAllShaders answer to the question “how to get all shaders in a light, even the disconnected ones”

Getting the selected FxTree nodes


You can use the undocumented selectednodes attribute, which was added in Softimage 2014.

views = Application.Desktop.ActiveLayout.Views
v = views.Find("Fx Tree") or views.Find("View Manager").Views.Find("Fx Tree")
if v:
    print v.GetAttributeValue("selectednodes")  # None

The FxTree view also has a targetcontent attribute, which is documented.

* hat tips to csaez (code) and luceric (attribute)

Installing PyQtForSoftimage


I read somewhere that installing PyQtForSoftimage could be difficult, so I gave it a try. I didn’t have any problems.

For my test, I installed PyQtForSoftimage in Softimage 2014 SP2, using Python 2.7.3 and pywin32 218.

Here’s a recipe that will work with Softimage 2014 and earlier. But if you’re using Softimage 2014, you can skip the part about using the system Python. Instead, use PYTHONPATH to point to folder where PyQt4 is installed (hat tip: Tim C).

On-sentence-summary
You need to switch from the Python installed with Softimage to the system Python (and pywin32), install PyQT, and then install the PyQtForSoftimage addon.

General Recipe

  1. Download and install Python 2.7.x (Note that Softimage ships with Python v2.7.3).
  2. Download and install pywin32 (Softimage ships with pywin32 217).
  3. In the Softimage Scripting preferences, clear the Use Python Installed with Softimage check box. Then restart Softimage.
    PythonInstalledWithSoftimage

    Or edit your prefs file (%XSI_USERHOME%\Data\Preferences\default.xsipref) and add this line: scripting.sipython = False

  4. Check that Python is working in Softimage. In the script editor, run a Python snippet like this: Application.LogMessage( “Hello World” )
  5. Download and install PyQt.
  6. Download (right-click and then click Save As) and install the PyQtForSoftimage addon.
  7. Check that everything is working. Open the Plug-in Manager, find PyQtForSoftimage, and run some of the examples.
    PyQt_Example

    I found that the ExampleDialog and ExampleSignalSlot examples did pop up dialogs, but the Log Text button didn’t log anything to the history log.

Softimage 2014 Recipe

  1. Download and install PyQt.
  2. Set the PYTHONPATH environment variable to point to the location of PyQt4. You could do this in setenv.bat, or in the System environment variables.
  3. Download (right-click and then click Save As) and install the PyQtForSoftimage addon.
  4. Check that everything is working. Open the Plug-in Manager, find PyQtForSoftimage, and run some of the examples.

Scripting FBX export and import


You can use the FBXExport command to create the ExportFBXOptions property, and then use either the OM or SetValue to set the FBX options. For example, this Python snippet creates the FBX property by calling FBXExport( “option” ), and then sets the FBX SDK version (for which there is no separate FBXSetExport command).

si = Application
si.FBXExport( "option" )
o = si.Dictionary.GetObject( "ExportFBXOptions" )
o.Parameters( "FBXSDKVersion" ).Value = "FBX201300"

You can do the same thing for FBXImport with FBXImport( “option” ), but I always got an error, even if the property was created.

si = Application

try:
	si.FBXImport( "option" )
except:
	o = si.Dictionary.GetObject( "ImportFBXOptions" )
	
si.LogMessage( o )

Adding ReferenceWidgets to PPGs?


It used to be possible to add a ReferenceWidget by calling oLayout.AddItem( “Param”, “ref”, “ReferenceWidget” ) in your DefineLayout. But that was four or five years ago, and it no longer works.

def MyProperty3333_DefineLayout( in_ctxt ):
	oLayout = in_ctxt.Source
	oLayout.Clear()

	# Test some other control types
	oLayout.AddItem( "Param", "txt", "Texture Space" )
	oLayout.AddItem( "Param", "scnref", "SceneReferenceWidget" )

	# Doesn't work
	oLayout.AddItem( "Param", "ref", "ReferenceWidget" )

	# Doesn't work
	oPPGItem = oLayout.AddItem( "Param", "", "dscontrol" ) ;
	oPPGItem.SetAttribute( "UIType", "ReferenceWidget" );

For reference 😉 this is a ReferenceWidget:
ReferenceWidget

And this is how a ReferenceWidget is added in SPDL:

	Parameter "inst_source" input
	{
		title = "Instance source";
		guid = "{5620730D-AEFC-4C4A-B1DF-9377E808E27B}";
		type = reference;
	}
...
	inst_source
	{
		Name = "Source Object";
		UIType = "ReferenceWidget.ReferenceWidget.1"
		{
			filter = "{6B579D20-3DC5-11D0-9449-00AA006D3165}";
			mode = "single";
		}
	}