Getting the Renderer options for the current pass is just a one-liner:
Application.GetValue( "Passes.Current.RendererOptions" )

Getting the Renderer options for the current pass is just a one-liner:
Application.GetValue( "Passes.Current.RendererOptions" )
Let’s take a look at a question that was posted recently on the Softimage mailing list:
From: softimage-bounces@listproc.autodesk.com [mailto:softimage-bounces@listproc.autodesk.com] On Behalf Of Adam Sale
Sent: Tuesday, January 08, 2013 3:40 PM
To: softimage@listproc.autodesk.com
Subject: Force ppg to open on script launchI’m a little confused as to why the following does not work:
– Get a sphere
– Run Deform > Smooth
– PPG appears and all is good.Now, take the generated command and run it through the script editor
ApplyOp(“Smooth”, “torus”, 3, siPersistentOperation, null, 0);
This time, no PPG appears.
Any idea why? And is there a way to force a ppg launch when I tun the command from a button or from the script editor?
Thanks 🙂
Adam
Matt Lind explained why on the list, but I’ll take a little more detailed look into how commands like Smooth work.
Deforms like Smooth (and Relax and Push and Bend and others) are commands that are mapped to a special handler function in $XSI_HOME\Application\DSScripts\operators.vbs.

The ApplyOpProc provides special-case handling for applying operators, and also takes care of popping up a PPG after the operator is applied.
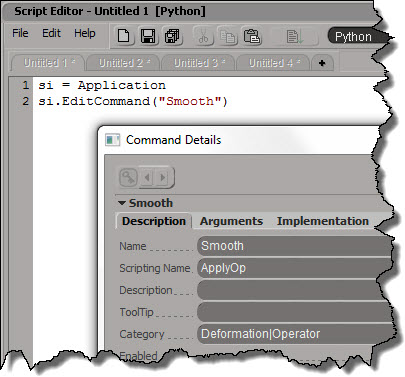
Don’t try to run “Smooth”; you’ll just get an error. It’s scripting name is actually ApplyOp.
ApplyOp is also implemented by a VBScript handler in operator.vbs. This time, it’s ApplyOpFunc, and ApplyOpFunc does not inspect the created operators.
If you want to apply a Smooth operator from your script, and pop up the PPG after, here’s one way to do it:
si = Application
si.AutoInspect( si.ApplyOp("Smooth", si.Selection, 3, "siPersistentOperation", "", 0) )
Here’s a snippet that shows how to launch a command-line program in a command prompt window, and keep the command prompt window open so you can see the output. Note that does not block Softimage.
#sKick = "C:/Users/SOLIDANGLE/Documents/Workgroups/sitoa-2.5.0-2013/Addons/SItoA/Application/bin/nt-x86-64/kick.exe"
sKick = XSIUtils.BuildPath( Application.InstallationPath( 2 ), "Addons", "SItoA", "Application", "bin", XSIUtils.Environment("XSI_CPU_OPT"), "kick.exe" )
XSIUtils.LaunchProcess( "cmd /C start cmd /K %s -licensecheck" % sKick )
Basically, what this does is launch a cmd.exe process, and in that process, run the command “start cmd /K kick -licensecheck”. The second “cmd” is required to open a command prompt, where you’ll see the output of “kick -licensecheck”.
In JScript, it would be something similar:
sKick = XSIUtils.BuildPath( Application.InstallationPath( 2 ), "Addons", "SItoA", "Application", "bin", XSIUtils.Environment("XSI_CPU_OPT"), "kick.exe" )
XSIUtils.LaunchProcess( "cmd /C start cmd /K " + sKick + " -licensecheck" )
In Python, you could also do this:
from subprocess import call
call(["cmd", "/K", sKick, "-licensecheck"])
The above would open a non-blocking command prompt window (eg you could go back to Softimage), but this next snippet would prevent Softmage from responding until you closed the command prompt:
import os
os.system("cmd /k %s -licensecheck" % sKick)
Early this week, I posted a script that did a random shuffle of a collection of objects. That script used tuple assignment to swap elements in a list; here’s a simpler example, with the tuple assignment (line 9) highlighted:
import random
v = [o for o in Application.Selection]

print [o.Name for o in v]

# random shuffle
for i in range( len(v) ):
	j = random.randint( i, len(v)-1 )
	v[i], v[j] = v[j], v[i]

print [o.Name for o in v]

# [u'cube', u'cube1', u'cube2', u'cube3', u'cube4', u'cube5', u'cube6', u'cube7', u'cube8']
# [u'cube5', u'cube4', u'cube7', u'cube2', u'cube1', u'cube3', u'cube', u'cube8', u'cube6']
Looking at that line, you might wonder why you don’t end up assigning the same value to both a[i] and a[j] (eg, how does that line not do a[i] = a[j] and then a[j] = a[i] ?).
In tuple assignment, the right-hand side is considered a tuple of values. So the right-hand side is evaluated first, and then the resulting values are pairwise assigned to the tuple on the left hand side. For example, consider this-rather-more-concrete snippet:
a = 2
b = 8
a,b = b-a,b+a
print a
print b
# 6
# 10
The right-hand side “b-a,b+a” is first evaluated, giving the tuple 6, 10, so you effectively have this:
a,b = 6,10
 Via a tech-artists.org tweet, I came across some MAXScript for randomly selecting a specified percentage of mesh elements (for example, give me a random selection that includes 35% of all vertices).
I converted it to Python in Softimage. Note that I don’t really shuffle a collection: you can’t set items in a collection, so there’s no way to swap items. Instead, I put the collection in a list and shuffle the list.
Shuffling actually makes this harder than it has to be. Check out Alan’s nice script for a better way to do this.
si = Application
log = si.LogMessage
sisel = si.Selection
#http://creativescratchpad.blogspot.ca/2011/06/select-random-elements-by-percentage.html

import random

#
# Return a list that includes a randomly selected
# percentage of the items in a collection
#
def get_random_percentage( collection, percentage ):
	v = [x for x in collection]

	# random shuffle
	for i in range( len(v) ):
		j = random.randint( i, len(v)-1 )
		v[i], v[j] = v[j], v[i]

	# select by percentage
	step = 100/percentage
	w = []
	for i in xrange( 0, len(v), step ):
		w.append( v[i] )

#	print len(w)
#	print (percentage/100.0) * len(v)

	return w


Application.SelectObj("torus", "", True)
# Select a random 50% of the vertices
x = get_random_percentage( sisel(0).ActivePrimitive.Geometry.Vertices, 50 )
si.SelectObj(x)

print sisel(0).SubComponent.ComponentCollection.Count

# Suppose you had 2000 cubes.
# Select a random 25% of those 2000...
Application.SelectObj("cube*", "", True)
x = get_random_percentage( sisel, 25 )
si.SelectObj(x)
I learned a couple of things about MAXScript:
When you stick something, like say a Vertex, into an XSICollection, you get a CollectionItem. But you can get back to the Vertex if you know how (via the SubComponent
).
si = Application
log = si.LogMessage
sisel = si.Selection
import win32com.client

oColl = win32com.client.Dispatch( "XSI.Collection" )
o = sisel(0)

print si.ClassName( o.ActivePrimitive.Geometry.Vertices(0) )
# Vertex

#oColl.Add( o.ActivePrimitive.Geometry.Vertices(0) )
oColl.AddItems( o.ActivePrimitive.Geometry.Vertices )
print si.ClassName( oColl(0) )
# CollectionItem

print si.ClassName( oColl(0).SubComponent.ComponentCollection(0) )
# Vertex

a = o.ActivePrimitive.Geometry.Vertices(0)
b = oColl(0).SubComponent.ComponentCollection(0)
print a.IsEqualTo(b)
# True
print b.IsEqualTo(a)
# True
Here’s something I was trying to do in ICE (without using any Repeats).
Given an array like
a = [ 5, 2 ,3 ]
create an array like
b = [ 0, 0, 0, 0, 0, 1, 1, 2, 2, 2 ]
See the pattern? (a[0] is 5, so array b has five elements with value 0).
In Python, using list comprehension, you can do it like this:
a = [ 5, 2, 3 ]

print [ i for i in range( len(a) ) for j in range( a[i] )]
The list comprehension is the equivalent of:
for i in range( len(a) ):
	for j in range( a[i] ):
		print i
Here’s a script that goes through the SimulationEnvironments of a scene and find the 3d objects in each SimulationEnvironment. This snippet builds a dictionary of 3d objects, indexed by simulation environment.
from siutils import si
si = si()					# win32com.client.Dispatch('XSI.Application')
from siutils import log		# LogMessage
from siutils import disp	# win32com.client.Dispatch
from siutils import C		# win32com.client.constants

from xml.etree import ElementTree as ET

# Use a dictionary to store the 3d objects keyed by Environmen
dict = {}
for e in si.ActiveProject2.ActiveScene.SimulationEnvironments:
	stack = XSIUtils.DataRepository.GetConnectionStackInfo( e.SimulationTimeControl )
	xmlRoot = ET.fromstring( stack )
	for xmlConnections in xmlRoot.findall('connection'):
		o = xmlConnections.find( 'object' )
		dict[ si.Dictionary.GetObject( o.text ).Parent3DObject.FullName ] = e.FullName

log( "3DObjects and their SimulationEnvironments" )
for key, value in dict.items():
	log( "\t%s, %s" % (key,value) )

log( "" )

log( "SimulationEnvironments and 3DObjects" )
dictvals = set( dict.values() )
for env in dictvals:
	log( "\t%s" % env )
	list = [k for k, v in dict.iteritems() if v == env]
	for o in list:
		log( "\t\t%s" % o )
Here’s some sample output from the script:
# INFO : 3DObjects and their SimulationEnvironments
# INFO : 	pointcloud1, Environments.Environment
# INFO : 	Point_cloud_chaser.pointcloud2, Environments.Environment1
# INFO : 	grid, Environments.Environment
# INFO : 	Point_cloud_chaser.pointcloud1, Environments.Environment1
# INFO : 	pointcloud, Environments.Environment
# INFO : 	Point_cloud_chaser.pointcloud, Environments.Environment1
# INFO :
# INFO : SimulationEnvironments and 3DObjects
# INFO : 	Environments.Environment1
# INFO : 		Point_cloud_chaser.pointcloud2
# INFO : 		Point_cloud_chaser.pointcloud1
# INFO : 		Point_cloud_chaser.pointcloud
# INFO : 	Environments.Environment
# INFO : 		pointcloud1
# INFO : 		grid
# INFO : 		pointcloud
Use IsEqualTo, don’t use your scriping language equality comparison operaor. For example, here I’m using IsEqualTo to check if an object’s material is the Scene_Material.
si = Application
print si.Selection(0).Material.IsEqualTo( si.ActiveProject.ActiveScene.Root.Material )
Sometimes when you’re troubleshooting, it’s a good idea to check the environment in which Softimage is running.
You can check specific environment variables in the script editor like this:
import os
print os.getenv( "XSI_USERHOME" )
print os.getenv( "TEMP" )
or like this:
print XSIUtils.Environment("XSI_BINDIR")
But I would typically use Process Explorer to see the full environment:

or Process Monitor (in Process Monitor, you just have to find the Process Start operation for XSI.exe and double-click it).

